
Recent Blog Posts
- The People's Jamboree: Strikes Back
- The People's Jamboree: Strikes Back
- The People's Jamboree: Strikes Back
- The People's Jamboree: Strikes Back
- The People's Jamboree: Strikes Back
- The People's Jamboree: Strikes Back
- The Cremorne, Sheffield 26th October 2012
- The Bedford Incident @ The Cremorne, Sheffield 26th October 2012
- The Bedford Incident @ The Cremorne, Sheffield 26th October 2012
- The Bedford Incident @ The Cremorne, Sheffield 26th October 2012
Recent Comments
Greg's Photos on Flickr

What I'm Listening To...
Tags
Photos
I'm starting a 365 project.
Tue, 29/12/2009 - 17:46 — gregWhat the fudge is a 365? I hear you scream! Well a 365 project is when you take a photo a day for a whole year and post them on-line. There are a number of different types of 365 project, some are concerned with taking a self portrait every day, others demand you must take a picture of the same object every day but in a different setting. Both of these have their merits but I don't think I am vein enough to want to post pictures of myself! Instead I'll be posting photographs of whatever catches my eye on that particular day.
I'll be starting my project on 1st of January and I'll be posting the photos on flickr and on my new 365 photoblog which can be found at:
http://greg365.mcmull.in
Many 365 projects also include other daily tasks. Such as reading a page from your cameras manual each day and checking out other sources of photographs. I will try and incorporate both these into my project but I will also try to include other sources of inspiration which will no doubt present themselves.
I wont be neglecting this blog though, any pics that I feel are super-awesome I will no doubt cross post to here but the majority of my photos will be posted over at the Greg365 site.
I hope you will join me in this project and get involved by leaving some comments be they good or bad! Wish me luck!
Shooting With Film
Thu, 27/08/2009 - 15:36 — greg
I bought an old Minolta SLR off eBay a couple of weeks ago for £20. Last weekend I went to Sam's house warming and shot a whole roll of film, for the first time since 2003. I think I missed it! There is something very satisfying about shooting with film. I'm tying to decide what roll to buy next? 1600ISO black and white perhaps?
The rest of the roll can be seen in the photo section. The best few shots were are also on my Flickr page.
Looking into the Sheffield Eye.
Mon, 17/08/2009 - 09:46 — greg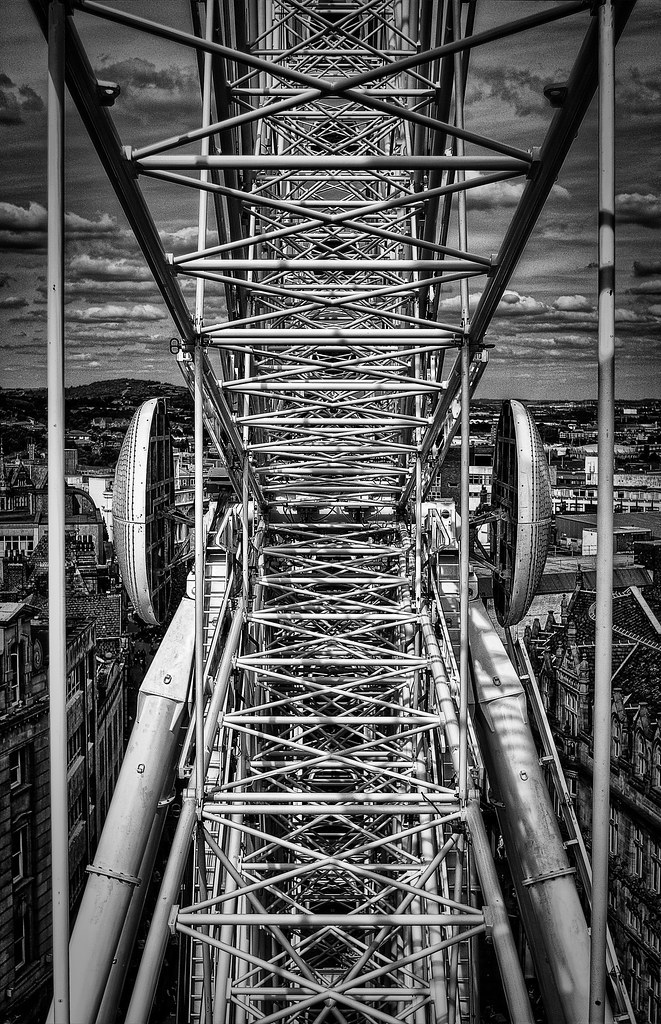
Another HDR of the big wheel in Sheffield's city centre. I am really loving this B&W technique and will be trying it a lot more in the future.
How Awesome Are Flickr's Customer Service?
Sat, 15/08/2009 - 11:28 — greg|
|
Yesterday was my birthday yay! I asked Chrissie a couple of weeks a go for a Flickr Pro account as my main gift. I already use Flickr and going pro seems like a logical progression. So when I was at work Chrissie tried to upgrade my account by buying a gift account. But something went wrong (probably PEBCAK) and she accidentally signed herself up for a pro account! Now Chrissie is not a big photo taker, so the thought of her with a Flickr Pro account is a little silly.
What was I to do? Flickr's T&C's explicitly state NO REFUNDS! I thought I would be totally out of luck so I created this thread on the Flickr help boards, fully expecting to be told I was on a hiding to nowhere.
The very first response was from Brenda a Flickr user with a spare Pro code! Wow what a gal! I held off from using her code though as I wanted an official response from Flickr as to what their policy is in this situation. Sure enough a few hours later I got a flickrmail from Heather at Flickr customer care:
Hello, greg.mcmull.in!
This is an automatically generated copy of a help case reply:
-------------------------
I would hate for you to have an unhappy birthday.Here's a code for a year of Pro:
xxxxxxx
http://www.flickr.com/gift/activate
Your fiancée can keep the one she applied to her account.
Oh, and I hope that forum topic title doesn't become an issue.
Regards,
Heather
Wow! I was shocked. That is premium customer care. Hats off to you Flickr you have just made a guy and his fiancee very happy.
So thank you Brenda, you can keep your code but thanks for the gesture. Thank you Heather, you really made my day. And thank you Flickr, if only all Customer Service interactions could be as good.
Bring out the Fail Whale
Wed, 12/08/2009 - 22:40 — gregAh crap. Too much tinkering. I have broken the photos section and wont be able to fix it for a while. Hopefully it will return bigger and better than ever.
I'm really quite proud of this shot.
Tue, 11/08/2009 - 12:04 — greg
Went for a photo walk on Saturday and took a ride on the big wheel they now have in the centre of Sheffield. A bit of HDR trickery and that was the result.
Photo section fixed! Kind of.
Fri, 14/09/2007 - 02:49 — gregThanks to James McNeil who posted a fix to the drupal picasa module problems, over at the drupal Pucasa pages. The photo section is up and running again. There has been a little change though, when you click trough from the photos page you will get an automated slideshow! How cool is that!
So thanks again James.
Problem with photo section.
Mon, 02/07/2007 - 17:25 — gregGoogle have changed their API on the Picasa system. So the photo section is slightly broken. You may have noticed that all the thumbnails have shrunk. I've been in contact with the creators of the Drupal Picasa Module and they have assured me they will look into it. But in the meanwhile here is the link to my picasa web albums.
http://picasaweb.google.com/gregmcmullin
HOW TO: Dismantle a Sony Ericsson k750i and fit a new casing
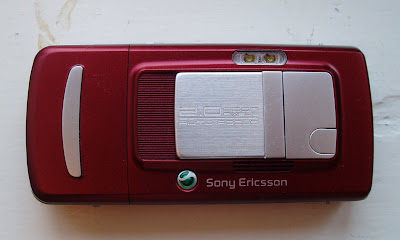
Fri, 04/05/2007 - 05:06 — gregYou may have read my post about upgrading the firmware on my well used old k750i. Well that got me thinking. What else could I do to give it a new lease of life. As you can see the casing was pretty beat up. And the camera lens cover was completely missing!
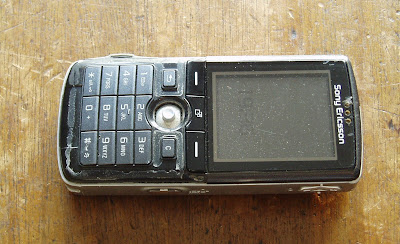
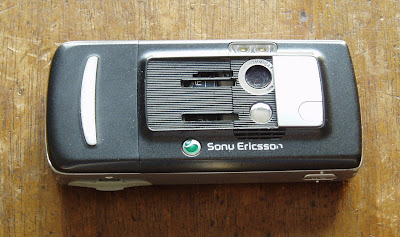
So what could i do? I hit ebay and found you could buy replacement casings for less then £10. So I ordered a nice shiny red one and waited for it to be delivered. And waited, and waited, and waited. Eventually 3 weeks later it arrived. The perils of buying from China I suppose. Anyway it looked excellent, as you can see:
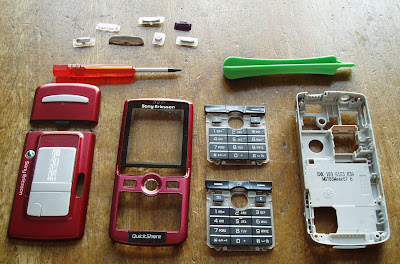
It came with a size 6 torx screwdriver and a case opener. Just the tools needed to dismantle the phone.
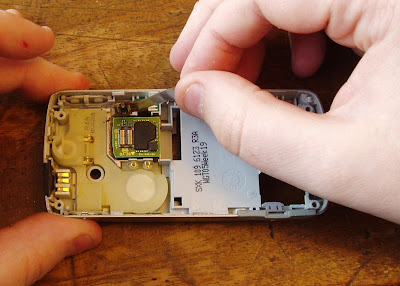
The next step was to strip down the k750i into its component pieces. Its surprisingly not difficult. First I had to use the torx driver to remove the 2 screws in the battery compartment. And the two tiny phillips head screws that held the back fascia down.

Then using the case opener I was able to pry the rear fascia away from the main housing. The trick was to start at the battery compartment end and work down each side to the top.

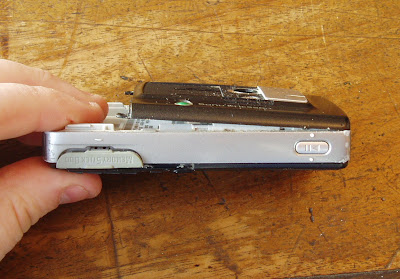
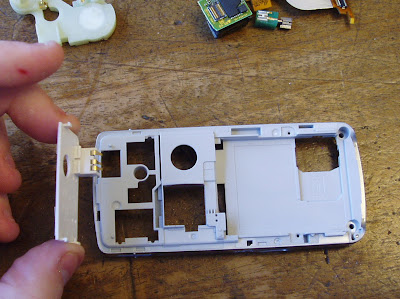
Once the back fascia was removed, I had a better view of what was inside.
The same process could then be repeated on the front fascia, gently prying off the casing being careful not to use too much force near the LCD display.
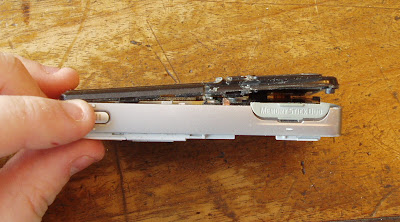
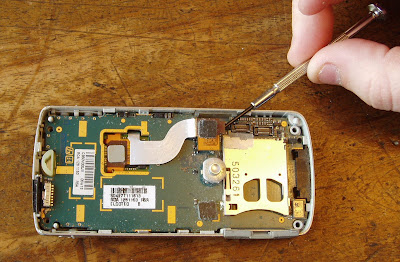
Now the guts of the beast are on display! Along with two more torx screws which need to be removed before we go any further.
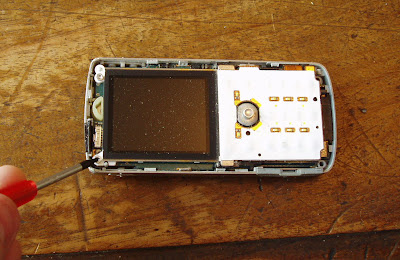
Now the time has come to remove the keyboard unit. It actually comes off rather easily with only a little force. But if you are feeling scared you can prise the socket apart with a small screwdriver. You can see that most of the major parts simply click together using a plug and socket technique. This makes it VERY easy to dismantle and rebuild.
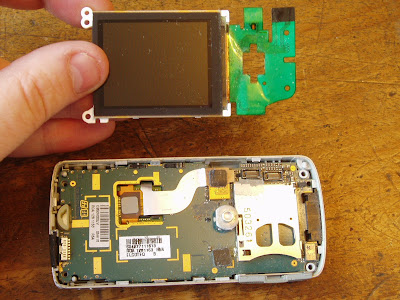
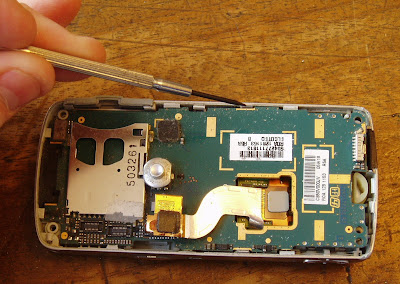
The LCD can now be disconnected from the main board in the same fashion.
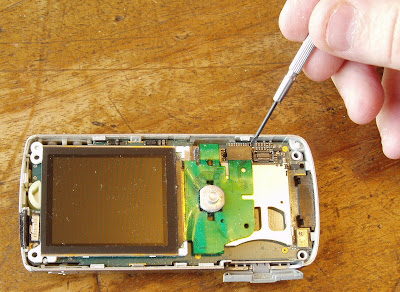
Be careful with the LCD as it is by far the most fragile part of the phone. Its also worth giving each part a thorough clean before rebuilding, my phone was FULL of finger grime after years of use under several different members of my family.
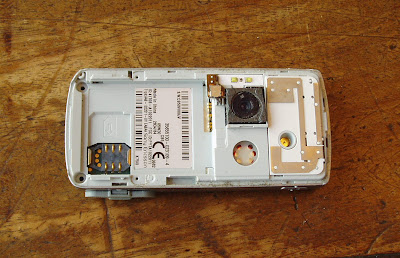
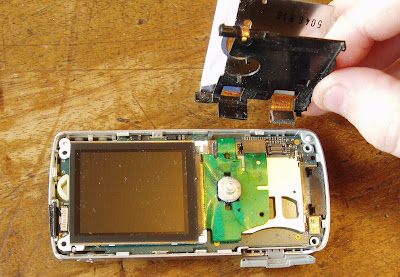
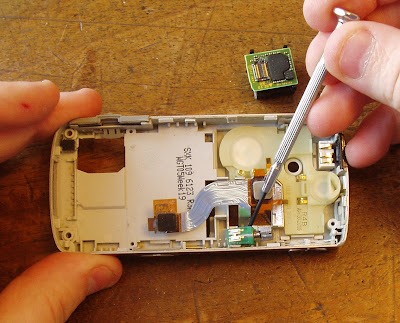
The camera unit can now be disconnected from the main board.
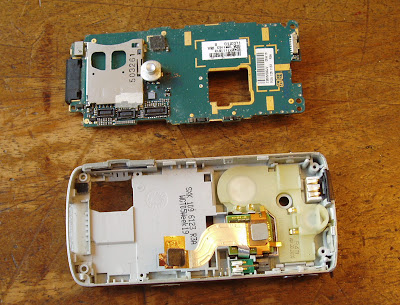
Now we remove the main board. Its held in by a couple of clips on the main housing. Simply push these back with either a small screwdriver or the opening tool.
The main board removed from the body, showing the main camera unit and the speaker unit.
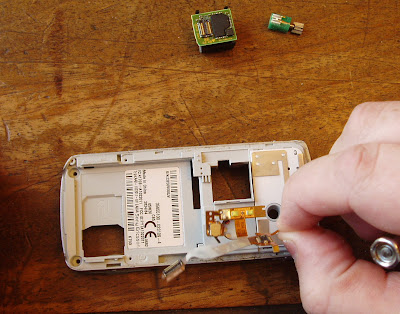
Now this is where it gets kind of tricky. You can pop the connection ribbon off the top of the camera.
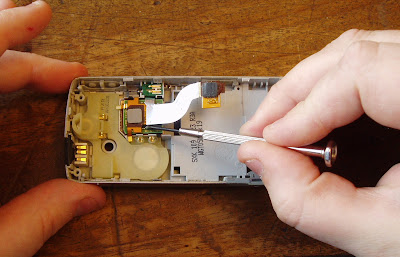
Like so:
The camera unit just slides out, and is surprisingly compact. Next step is to gently pry out the vibration motor.
Then flip the entire unit over and GENTLY peel the camera connection ribbon and switch off the back of the housing. It is actually stuck down with glue but peels off easily once you have got a corner up.
Now we turn attention to the speaker unit. Now it the beat time to go through the main housing ant take out all the buttons. There is a very small connector by the camera shutter release button that you must not overlook. Once you have all the buttons out you can start to worry about how you are going to pry up the speaker unit. I actually went in though the button hole for the play/pause button. It allowed me to get my little screwdriver underneath it and pry it up. It could then be removed with little fuss.
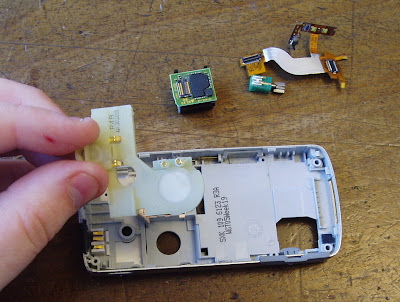
The final part to be removed is the backplate/IR transmitter unit. This just needs prying up from the rear side.
Thats It! Everything is now apart. You can now rebuild the phone using the new casing and buttons. I ended up using some of the old buttons though in places as the newer ones seemed to be slightly larger and where rather stiff. Here are some shots of the finished phone.

Not bad eh! Looks like a completely new phone. I'm very happy.
Larger versions of the photos in this post can be found in the relevant web gallery.
New! Photo Section using Picasa Drupal module
Mon, 23/04/2007 - 14:50 — gregJust found a drupal module for Google's Picasa photo sharing site. It integrates he web albums I have stored there into my own peronal site! Woo! Thats some good integration going on there! I was using flikr, but they have annoyed me by crippling the sevice if you dont sign up for a paid for pro account. So I'm deleting my flikr account and moving to Picasa. I'll probably do a full write up about my experiences between the two later.